Tutorial: Writing plugins
Plugins in Openplanet are written in Angelscript. You can find a quick overview here and the full documentation of the language here.
Note: In order to write your own plugins, you need Club Edition in Trackmania (2020) - for details please see here.
Setting everything up
For writing a plugin, you do not need special tools - any text editor and a tool to create .zip files with is enough. However, you may find it much easier to use a dedicated code editor like Visual Studio Code or Sublime Text, both of which offer plugins for language highlighting in Angelscript. Additionally, a tool like 7-zip may make bundling your plugin into a .zip file easier.
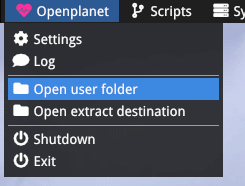
Any custom Openplanet plugins are saved at C:\Users\<username>\Openplanet<...>\Plugins - substitute your username and open the folder for your version of Openplanet. Depending on the game (Trackmania (2020), Maniaplanet or Trackmania Turbo), the Openplanet folder may be called differently. In here, we'll create our plugin's folder - we'll call it TestPlugin.
Tip: If you have trouble finding your user folder (where the /Plugins folder is located) you can open it from the Openplanet overlay:
Enabling Developer Mode
In Openplanet 1.24.4 the Developer Mode was introduced - by default it is disabled to prevent unsigned plugins from being loaded, however, we have to enable the Developer Mode as our plugin will not be signed during development - it will only be signed once you upload it to the website and once it has been reviewed.
To do so, open the Openplanet overlay and select the "Developer" option in the Developer -> Signature Mode menu. After selecting this option the mode is enabled, to disable it again, deselect the option and restart the game. (Optionally, you can enable developer mode on game startup through the Openplanet settings.)

Now that we have enabled the Developer Mode, we can go ahead and start working on our plugin.
Writing the plugin
Modern plugins consist of at least two files:
info.toml, a file containing the plugin's metadata, such as name, author, ...- an Angelscript file, containing the actual code of the plugin
Let's start with the info.toml file and afterwards we'll write our plugin code.
info.toml
All Openplanet plugins have to have a file called info.toml at the root of the plugin. This file contains meta-information about the plugin such as its name, author, dependencies and so on.
Our plugin is going to be pretty simple - we only need to provide the plugin's name, author and a category, so we can identify it in Openplanet's plugin list later:
[meta]
name        = "Test Plugin"
author      = "Timmy"
category    = "Testing"
For a comprehensive guide on metadata you can write into the info.toml file, please refer to the modern plugins guide.
Writing code
Since our plugin is supposed to do something, we have to provide an entry point and an actual code file. We'll create a file called main.as in our plugin folder. The names of the script files within the plugin do not matter, but a well-structured plugin makes it a lot easier to work on the code.
Our file will contain the main entry point of any plugin, void Main(). This is the function that is called when the plugin is loaded. For that, we just write this into the file:
void Main()
{
   print("Hello world!");
}
The line print("Hello World!") will print a given message ("Hello World!") into the Openplanet log, so we can see if our plugin works when we load it. This is enough for now, as we just want to get our plugin to work, not write fancy code. The next chapters of the tutorial will cover how to make our plugin do all kinds of useful things.
Additionally, you can write your code in multiple files, as Openplanet loads the whole plugin directory as a single script module - think of it as all code files being merged together. Therefore, avoid multiple definitions of things with the same name, as the plugin may not behave as you'd expect (or not compile at all).
Testing everything up to now
With our info.toml and main.as files done, we're ready to test our plugin for the first time!
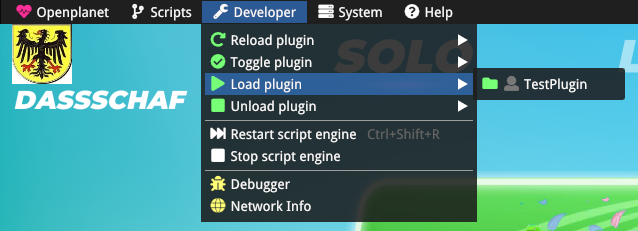
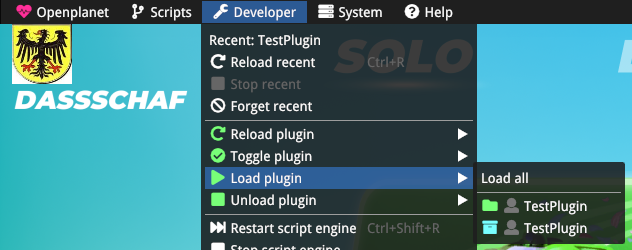
To try our plugin, we need to start Trackmania and open the Openplanet overlay (with F3). In the Developer menu item, you have the option to load a plugin called "Test Plugin" now - that's exactly what we just created!
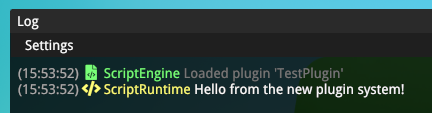
If everything went to plan, we should see two new lines in our log now - firstly, one saying that our plugin was loaded and secondly, the line we wanted to see in the log:
Packing the files
If you ever wondered what's up with the .op-file that is the plugin - it's just a renamed .zip-file to pack all plugin files into a single file with. We need to do this when we want to ship our plugin when we're done with writing the scripts and testing if it works.
In order to create it, you open the folder we created back then in the file explorer and select all the files inside the folder and make a new zip archive (for example with 7-zip). It's okay to use compression, but don't put a password on it. Also make sure it's a zip file - rar files do not work!
If you created your zipfile with 7-zip, your file is probably going to be called TestPlugin.zip, since that's the folder whose contents we packed into an archive, so we'll rename the file to TestPlugin.op and place it into the Plugins folder. To check if everything worked, we'll unload the plugin inside the folder (look for the folder icon in front of the plugin name).
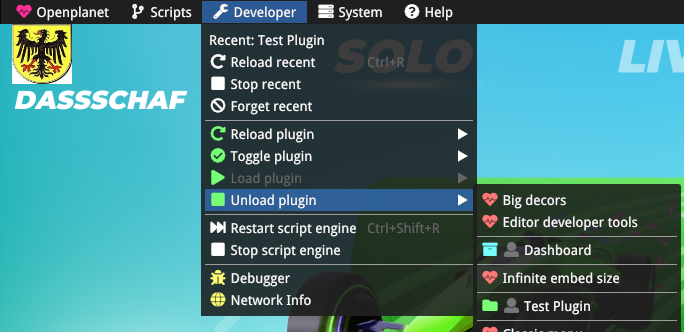
Now you can load the plugin again from the archive we've created (look for the box icon in front of the plugin name).
It loads, we'll see the message in the log we wanted to see... this means we're done! We've successfully created a plugin with the new plugin system.
Signatures
Plugins have to be "signed" for them to work on the Starter and Standard editions of the game. As of recently, that now happens on the website itself, as part of the new plugin review process. Simply submit & upload your plugin here and click the checkbox to request your plugin to be signed.
Next steps
Now we're pretty much done with the basics of making a plugin - it's just not particularly useful yet. To learn more about plugin scripting, follow the next chapter of the tutorial: Entry point execution.